Math plays a HUGE role in the world of engineering (aka my passion & future career). Math plays a HUGE role in the world in general. Math is everywhere, and yet so many people can’t stand it at all. As a self-proclaimed math lover, I constantly stumble on the beauties of math, and strive to show people how amazing math can be.
Which is why I am a Mathletes executive at my school. Specifically, the President, starting this year. It’s a huge responsibility, but one I have eagerly prepared for thanks to the support of the previous execs who have now graduated.
One of my goals as head is to ensure our attendance rates face minimal decline throughout the course of the year. It’s a well known fact at our school that the number of people at clubs skyrockets at the start of the year, when there’s a fresh wave a grade nines and the rest of the school population isn’t as worn down from the school work. However, by the end of the year, many students lose interest and motivation. This is why I aim to make Mathletes this year as engaging and fun as possible, to ensure students are eager and happy to do math on Fridays after school. It’s hard to fight against the students’ temptation of going home right away when there’s the sweet promise of the weekend, but I am determined.
The Preparation
At my school, most clubs don’t start until the week after (Canadian) Thanksgiving weekend, which is in October. This is because it gives time for the club sponsors (teacher who just supervises- the actual club is still run by student execs) to get settled into the new school year, and time to advertise clubs at events like the club fair.
Now, being given this time to prepare, the Mathletes team and I obviously had to make things amazing. Last year, for the first Mathletes meet, we did a Bomb Defusal Challenge to get students excited in a math-themed race against time!
However, the “bombs” themselves were….of questionable quality. By that, I mean it was a printed image. In black and white. Using our school printers. That was not going to fly this year. I wanted to have something more…physical? Three-dimensional? More planned?
As my team and I brainstormed ideas- we realised a huge flaw in our repeating the bomb defusal challenge as a 2nd annual tradition type thing: current events. With the war going on between Palestine and Israel, it was pointed out to us that it might not be appropriate to host such an event.
Back to the Drawing Board.

Go Big or Go Home
The concept of the bomb defusal was relatively simple: each question would be a multiple choice, where depending on which choice you select, you would receive a different instruction for defusing the bomb.
Remembering the escape room event I hosted last year, I thought, What if students have to open something instead of stop?
Thus, the concept of the Safe Decoder was created.
However, there was still the matter of the physical representation of the safe. Deciding this was the moment to use my expertise in hardware and circuits, I told my execs that I would make the safe. So while the rest of my teammates finished up the final touches (such as making sure we actually had solutions to the questions we made up), I hunkered down on making the ultimate vault.

The Build!
Okay, okay. I’m sure by now you’re wondering when I’m going to stop with all this exposition, and actually get on with the project. After all, this is a tech blog! So with out further ado, here’s how the build went:
Step 1: Design & Materials.
- Before I could start building, I had to actually figure out what I was building. Sure I knew it was going to be a vault, but how would it work? And importantly, how would I connect it to the Mathletes questions? Would the multiple choice questions lead the students to pressing colourful buttons that you would need to press a certain number of times? Or would there be switches? A mix of both? I knew I wanted to use an Arduino circuit, and incorporate some form of motors to automatically open the vault. Sifting through my hardware kit, my eyes landed on a 4×4 Keypad, and it all came together.
Step 2: Investigating The 4×4 KeyPad
- My plan was to make it so that each multiple choice option would have a keypad digit written next to it. That way, once every math multiple choice is answered, the students would have a vault “password” that they could type into the 4×4 keypad and open up the safe if correct. My first roadblock to this idea was the fact that I had never used a 4×4 keypad before. Thankfully, not knowing something is an easy fix in this day and age; time to go googling! I checked out a few posts and projects that used a 4×4 Keypad with arduino, plus an article on how 4×4 keypads work. Turns out it’s actually a matrix and follows a similar logic to the 5x5x5 LED Matrix I made! If you haven’t seen my post on that project, check it out (LINK) when you get the chance. Combining my experience from the LED matrix project with the matrices math I’ve done in the past, I was able to grasp the concepts behind the 4×4 Keypad! It’s fascinating how everything in STEM connects together 😉
Step 3: Tinkering the Circuit
- This step is always fun and low-risk. Before I started pulling out wires and my breadboard, I opened up TinkerCAD, the site I both love and can’t stand. The glitch-y-ness makes it terrible to use for lessons because there’s always multiple students whose circuit- which would be the EXACT same as another student’s circuit that’s working perfectly fine- doesn’t work. For no reason whatsoever! It’s ridiculous. However, I will admit, that for personal use, it’s great! I love building my circuits digitally first to test them out (make sure I won’t short circuit something), and then I can screenshot my process and use those for the lessons! Anyway, I tinkered (pun intended) around and eventually got a circuit (and code for the circuit) to my satisfaction.
Step 4: Building the Safe
- This is where things got significantly less thought out. At this point, I had a circuit where entering the correct password in the keypad would turn a servo motor. How exactly would the motor open the safe? Well, I wasn’t too sure. I had this vague idea that the motor would be attached to a piece of cardboard that would cover an opening. Then when the motor would turn, the cardboard piece would move with it such that it would no longer cover the opening? I faced a bit of scepticism when I proposed this idea, but it only motivated me more to prove myself. And in the end, my idea was successful! Spite is truly a beautiful motivation.
Step 5: The Final Touches (& Testing)
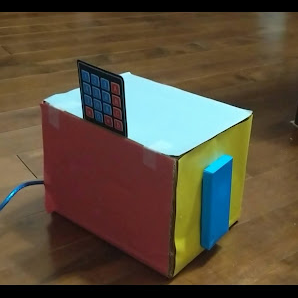
- The final touches mainly consisted of decorating the safe. This is because the safe was just a box I found lying around the house, and the cover was a cardboard lid of another box that held a small trinket. I feel like I made it far too colourful to be a realistic safe, but I was aiming for fun, okay?
Take a look and see for yourself!
Doesn’t it look exciting? The students had a great time trying to unlock the safe, and our Mathletes First Meeting was a great success. We had roughly 70 students attend!
(although we accidentally made the math questions too hard, so no one managed to open the safe…)
I’m so excited for what’s in store for Mathletes for the rest of the year! See you soon : )
p.s. please ignore my bandaged finger in the video above…I accidentally stapled myself while assembling the safe 😂

Leave a comment